# Generating HTML reports for your tests via Gradle
> Learn to create custom reports in Gradle using MarkupBuilder. This guide offers a starting method for crafting personalized project reports.
- URL: https://ishabbi.tech/posts/gradle-reporting-easy-way/
- Published: 2020-02-17
- Updated: 2026-10-26
- Tags: Gradle, Reports, Frameworks, Html, Css, Xml
In the test automation world, visualizing the results of your tests have an equal priority in conjunction with the tests being executed. How will you be able to make the most out of the tests being executed? Would a simple report having Pass/Fail ratio along with the screenshots suffice? or the reports need to be more comprehensive? maybe the report needs to keep a trend of the tests being executed over time? or needs to have a documented step for each action?
There are many frameworks for your reporting needs (two of the most notable ones are [Allure](http://allure.qatools.ru/) and [Extent](https://extentreports.com/) reports) in the market today, even gradle provides an in-house html report on execution of a junit/testng test.
In case your project is on gradle and you want to customize the reports or your tests run via a CLI, here I try to explain an easy way to start with generating your own custom HTML reports via gradle tasks using the Groovy MarkupBuilder.
* * *
## What is Gradle?
Gradle is an open-source build automation tool like Maven and Ant. It is build upon the same concepts as its predecessors with the only difference being that it is better in terms of performance and provides a Groovy-based DSL allowing you; the programmer to be more flexible. It supports languages like Java, Scala and Groovy with support for more languages planned for the future.
In case, your project is not part of the above system of supported languages you can create a project with the basic gradle settings too. Due to the DSL and task based structure of gradle, it provides you a lot of flexibility. As long as you can code the logic as a task, there are many things you can do in your project. You can read further about gradle tasks and build lifecycle [here](https://docs.gradle.org/current/userguide/tutorial_using_tasks.html).
* * *
## The Groovy MarkupBuilder
`groovy.xml.MarkupBuilder` is the Groovy helper class which will help us in generating the html file for our reports.
To create a tag using the markup builder you need to add a method call with the name of the tag that you want to create. Assuming the `xmlMarkup` as the object initialized, the below code :
```groovy
xmlMarkup.myCustomTag()
```
will create a tag `myCustomTag` in the XML/HTML format
```html
```
To add text to the tag created, just add a string as an argument. So, the below code :
```groovy
xmlMarkup.myCustomTag("Lorem Ipsum")
```
will produce :
```html
Lorem Ipsum
```
To add any attribute to a tag you can add key values as arguments to the call. So the below code :
```groovy
xmlMarkup.myCustomTag("class": "container", "name": "typical", "Lorem Ipsum")
```
will create the your tag, with the following attributes :
```html
Lorem Ipsum
```
To create nested tags, you need to add groovy closures :
```groovy
xmlMarkup.myCustomTag("class": "container", "name": "typical") {
tag1("class": "table") {
tag2("class": "turner","Lorem Ipsum")
}
}
```
To create self-closing tags you can use `mkp.yeild()` method call.
You can read more about MarkupBuilder [here](https://groovy-lang.org/processing-xml.html#_markupbuilder).
* * *
## Usage :
A typical gradle flow contains of tasks which are executed in a respective phase of the build’s cycle. A task in gradle’s terminology can be work such as executing tests for a build, copying a particular file to a different destination, executing a CLI command, archiving a folder, etc. The example shown below is of a test output in the JUnit’s XML format. For our use case, we’ll be creating a task called htmlReport which will read the data from a XML and write it down to the report as an HTML file.
Given we have a XML file as below :
```xml
Some Test Related Output
Some Test Related Output
Some Test Related Output
```
In order to convert the above into a custom HTML report, we’ll start with the below skeletal `build.gradle` file.
```groovy
import groovy.xml.MarkupBuilder
group ''
version '1.0-SNAPSHOT'
apply plugin: 'base'
task htmlReport {
// Write code here
}
```
The `apply plugin: 'base'` provides some tasks and conventions that are common to most builds. It also adds a structure to the build that promotes consistency in how they are run.
We can parse the above written xml in Groovy using `XMLParser`. The following code parses the xml document for us :
```groovy
def xmlFile = new XmlParser().parse(filename)
```
You can fetch values of a tag’s attributes by following the syntax :
```groovy
xmlFile.['@']
//To get name of a testsuite from the given xml
xmlFile.testsuite['@name']
//To get the name of the first test case present inside the testsuite
xmlFile.testsuite[0].testcase[0]['@name']
```
Now that we know how to read from the xml file. We start by initializing the MarkupBuilder for creating our html file :
```groovy
def xmlWriter = new FileWriter(file("${project.buildDir}/index.html"))
def xmlMarkup = new MarkupBuilder(xmlWriter)
```
As an HTML convention we’ll need to add the `DOCTYPE` tag
```groovy
xmlWriter.write("\n")
```
Using our learnings from the *The Groovy MarkupBuilder* section, we can create the HTML documents like the one below :
```groovy
xmlMarkup.html() {
head() {
meta(charset: "utf-8")
meta(name: "viewport", content:"width=device-width, initial-scale=1, maximum-scale=1")
title("Test Report")
link(rel: "stylesheet", href: "https://cdnjs.cloudflare.com/ajax/libs/materialize/1.0.0-beta/css/materialize.min.css", media: "screen,projection") { mkp.yield("") }
link(rel: "stylesheet", href: "https://fonts.googleapis.com/icon?family=Material+Icons") { mkp.yield("") }
}
body(){
header(){
div("class":"nav-wrapper"){
nav(class: "blue darken-3") {
a(class: "brand-logo", href: "#",id: "logo-container") {
img(class: "logo-img",src: "") {
mkp.yield("")
}
}
ul(class: "center flow-text", "TEST RESULTS")
}
}
}
div(class: "container") {
div(style: "margin-bottom: 50px;") {
table(class: "striped responsive-table", id: "example") {
thead() {
tr() {
th(class: "center","Test Suite")
th(class: "center","Passed")
th(class: "center","Failed")
th(class: "center","Total")
}
}
tbody() {
xmlFile.testsuite.each { testsuite ->
tr() {
td(class: "center",) {
a(href: "#",testsuite['@name'])
}
td(class: "center",Integer.valueOf(Integer.valueOf(testsuite['@tests']) - Integer.valueOf(testsuite['@failure'])))
td(class: "center",testsuite['@failure'])
td(class: "center",testsuite['@tests'])
}
}
}
}
footer(class: "page-footer blue darken-3") {
div(class: "footer-copyright") {
div(class: "container", "2018 - Sprinklr") {
a(class: "grey-text text-lighten-4 right", "")
}
}
}
}
```
So our build.gradle file should look like this :
```groovy
import groovy.xml.MarkupBuilder
group ''
version '1.0-SNAPSHOT'
apply plugin: 'base'
task htmlReport {
doLast {
def xmlFile = new XmlParser().parse(new File("xmlFileName"))
def xmlWriter = new FileWriter(file("${project.buildDir}/index.html"))
def xmlMarkup = new MarkupBuilder(xmlWriter)
xmlWriter.write("\n")
xmlMarkup.html() {
head() {
meta(charset: "utf-8")
meta(name: "viewport", content:"width=device-width, initial-scale=1, maximum-scale=1")
title("Test Report")
link(rel: "stylesheet", href: "https://cdnjs.cloudflare.com/ajax/libs/materialize/1.0.0-beta/css/materialize.min.css", media: "screen,projection") { mkp.yield("") }
link(rel: "stylesheet", href: "https://fonts.googleapis.com/icon?family=Material+Icons") { mkp.yield("") }
}
body(){
header(){
div("class":"nav-wrapper"){
nav(class: "blue darken-3") {
a(class: "brand-logo", href: "#",id: "logo-container") {
img(class: "logo-img",src: "") {
mkp.yield("")
}
}
ul(class: "center flow-text", "TEST RESULTS")
}
}
}
div(class: "container") {
div(style: "margin-bottom: 50px;") {
table(class: "striped responsive-table", id: "example") {
thead() {
tr() {
th(class: "center","Test Suite")
th(class: "center","Passed")
th(class: "center","Failed")
th(class: "center","Total")
}
}
tbody() {
xmlFile.testsuite.each { testsuite ->
tr() {
td(class: "center",) {
a(href: "#",testsuite['@name'])
}
td(class: "center",Integer.valueOf(Integer.valueOf(testsuite['@tests']) - Integer.valueOf(testsuite['@failure'])))
td(class: "center",testsuite['@failure'])
td(class: "center",testsuite['@tests'])
}
}
}
}
}
xmlFile.testsuite.each { testsuite ->
h2("Suite Name : " + testsuite['@name'])
h5("Total Tests Executed : " + testsuite['@tests'])
h5("Total Tests Failed : " + testsuite['@failure'])
h5("Date : " + testsuite['@timestamp'])
div(style: "margin-bottom: 50px;") {
table(class: "striped highlight responsive-table") {
thead() {
tr() {
th(class: "center","Test Name")
th(class: "center","Result")
th(class: "center","Failure Reason")
th(class: "center","Test URL")
}
}
tbody() {
testsuite.testcase.each { testcase ->
if(testcase.failure.size() <= 0) {
tr(class: "green lighten-5") {
td(class: "center",testcase['@name'])
td(class: "center","Passed")
td("")
td(class: "center") {
a(href: testcase.'system-out'.text(), target: "_blank", testcase.'system-out'.text())
}
}
} else {
tr(class: "red lighten-5") {
td(class: "center",testcase['@name'])
td(class: "center", "Failed")
td(class: "center", testcase.failure['@message'].toString().replace("[","").split("More info")[0])
td(class: "center") {
a(href: testcase.'system-out'.text(), target: "_blank", testcase.'system-out'.text())
}
}
}
}
}
}
}
}
}
}
footer(class: "page-footer blue darken-3") {
div(class: "footer-copyright") {
div(class: "container", "Ish Abbi") {
a(class: "grey-text text-lighten-4 right", "")
}
}
}
script(type: "text/javascript", src: "https://cdnjs.cloudflare.com/ajax/libs/materialize/1.0.0-beta/js/materialize.min.js") { mkp.yield("") }
}
}
}
```
All you need to do now is to place this report generation task after the task which executes your tests and you should be able to view your custom reports upon success/failure of the tests.
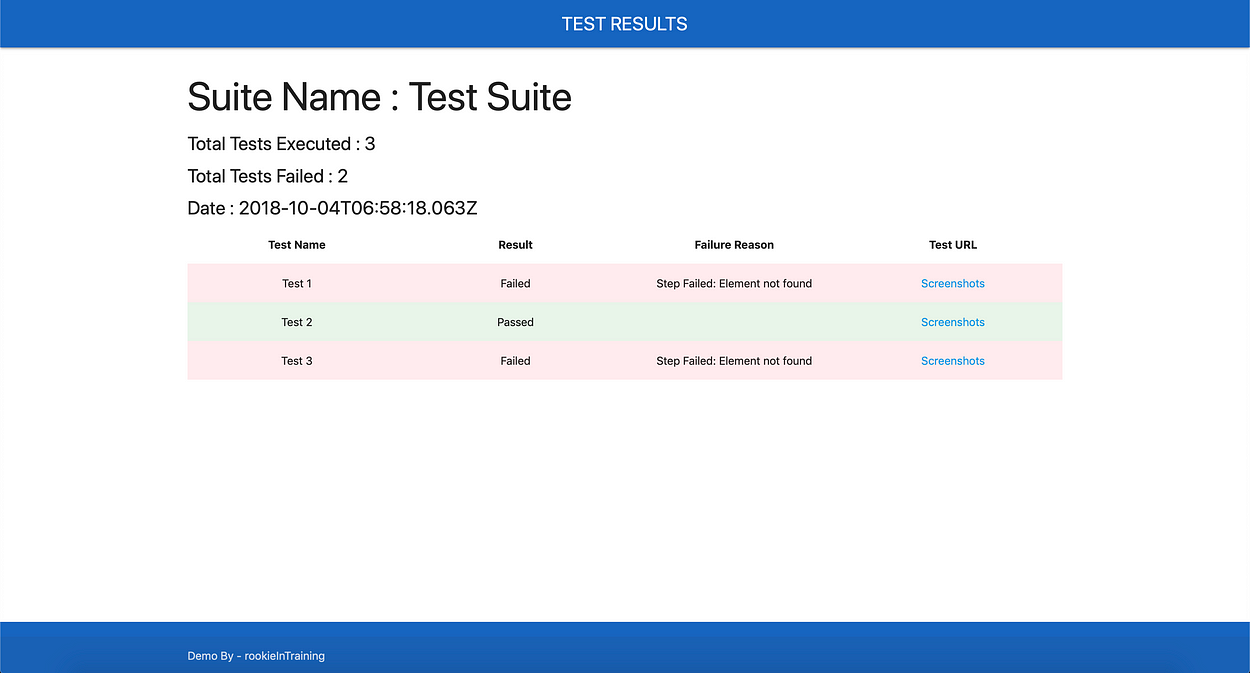
You can also refer to the example code hosted on [GitHub](https://github.com/rookieInTraining/gradleReportingExample).